模板工程搭建:Web-SDK/Library
此系列会与时俱进的不断更新
包含Node/Web SDK,单组件,组件库,Eslint插件,Webpack插件,Vite插件,MonoRepo等等工程化相关能力的模板建设
前言
在Web开发中,通常会把一些常用的方法,一个技术产品做成一个SDK或者Library(库)的形式,方便调用方直接接入使用
其中库/SDK又分为框架相关和框架无关的,本文主要介绍框架无关的 Web JS SDK/Library工程模板搭建,下文统称为Lib(库)
一点定义
产品定位是SDK还是工具库,取决于构建产物的功能与适用范围,两者之间的定位不绝对,工具库在不断的迭代过程中也可变为一个SDK
SDK(软件开发工具包)
包含一些列功能的库,这些功能通常由多个库或者sdk组合提供
如一个获取天气的SDK,可能包含定位sdk,网络请求库,资源处理库,数据库操作sdk等
Lib(库)
库是功能的集合,如chalk,loadsh,debug等等常用工具库,包含了一系列的工具方法或者某一类功能的方法集合
库运行环境
通常是在浏览器或者Webview控件中
使用方法
CDN
静态资源通常使用
OSS存储,通过CDN下发,所以通常叫做通过CDN引入资源
在html模板中通过script引入库的js资源,某些还需引入相应的css资源
<link rel="stylesheet" href="//cdn.example.com/path/sdk-version/sdk-name/style.css">
<link rel="stylesheet" href="//cdn.example.com/path/sdk-version/sdk-name.css">

<script src="//cdn.example.com/path/sdk-version/sdk-name/index.js"></script>
<script src="//cdn.example.com/path/sdk-version/sdk-name/index.min.js"></script>

<script src="//cdn.example.com/path/sdk-version/sdk-name.js"></script>
<script src="//cdn.example.com/path/sdk-version/sdk-name.min.js"></script><link rel="stylesheet" href="//cdn.example.com/path/sdk-version/sdk-name/style.css">
<link rel="stylesheet" href="//cdn.example.com/path/sdk-version/sdk-name.css">
<script src="//cdn.example.com/path/sdk-version/sdk-name/index.js"></script>
<script src="//cdn.example.com/path/sdk-version/sdk-name/index.min.js"></script>
<script src="//cdn.example.com/path/sdk-version/sdk-name.js"></script>
<script src="//cdn.example.com/path/sdk-version/sdk-name.min.js"></script>NPM Package
现代前端开发通常都会使用前端构建工具
因此除了通过CDN引入外,就是通过包管理工具将库的依赖安装到项目中,然后在源码中进行引入使用
import pkgName, { methodName } from 'pkgName'
import 'pkgName/dist/style.css'
import pkgName, { methodName } from 'pkgName'
import 'pkgName/dist/style.css'准备工作
项目初始化
mkdir web-lib-template

cd web-lib-template

npm init  -y
mkdir web-lib-template
cd web-lib-template
npm init -yGit初始化
git initgit init.gitignore内容
node_modules
dist
node_modules
dist安装依赖
这里使用新一代的包管理工具 pnpm
安装pnpm指令
npm install -g pnpmnpm install -g pnpm装依赖
pnpm add -D typescript rimraf vite eslint tslib core-js @rollup/plugin-typescript @microsoft/api-extractorpnpm add -D typescript rimraf vite eslint tslib core-js @rollup/plugin-typescript @microsoft/api-extractor@microsoft/api-extractor:汇总产物中的类型定义@rollup/plugin-typescript:用于构建阶段TS的转换core-js:用于js polyfill支持tslib:为TS提供一些辅助方法,Runtime library for TypeScript helper functionseslint:代码规范vite:开发阶段测试,与库的最终构建(Rollup提供构建能力)rimraf:替代rm -rf指令用于清理不需要的资源typescript:TS支持
typescript配置
创建tsconfig.json配置文件
只包含一些基础配置信息,其中
declarationDir:标识类型定文件的输出目录
{
  "compilerOptions": {
    "target": "ESNext",
    "module": "ESNext",
    "lib": ["ESNext", "DOM"],
    "moduleResolution": "Node",
    "strict": true,
    "sourceMap": true,
    "resolveJsonModule": true,
    "esModuleInterop": true,
    "noImplicitThis": false,
    "noImplicitAny": false,
    "declaration": true,
    "declarationDir": "./dist",
    "noUnusedLocals": true,
    "noUnusedParameters": true,
    "noImplicitReturns": true,
    "downlevelIteration": true,
  },
  "include": [
    "src/**/*",
   ],
  "exclude": [
    "node_modules"
  ]
}
{
"compilerOptions": {
"target": "ESNext",
"module": "ESNext",
"lib": ["ESNext", "DOM"],
"moduleResolution": "Node",
"strict": true,
"sourceMap": true,
"resolveJsonModule": true,
"esModuleInterop": true,
"noImplicitThis": false,
"noImplicitAny": false,
"declaration": true,
"declarationDir": "./dist",
"noUnusedLocals": true,
"noUnusedParameters": true,
"noImplicitReturns": true,
"downlevelIteration": true,
},
"include": [
"src/**/*",
],
"exclude": [
"node_modules"
]
}初始化src源码目录
src
├── constants
|  └── index.ts
├── index.ts
├── lib
|  └── pkg.ts
├── styles
|  ├── index.css
|  └── second.css
├── types
|  └── index.ts
└── utils
   └── index.ts
src
├── constants
| └── index.ts
├── index.ts
├── lib
| └── pkg.ts
├── styles
| ├── index.css
| └── second.css
├── types
| └── index.ts
└── utils
└── index.ts一点说明
文件 src/index.ts:主要用于模块内容的导出目录 src/lib:主要用于存放库的核心源码目录 src/types:TS定义文件目录 src/styles:样式文件目录 src/constants:常量目录 src/utils:工具方法
简单添加一些源码,完整请移步GitHub
src/index.ts
export { default } from './lib/pkg';
export type { DataItem } from './types/index';
export { default } from './lib/pkg';
export type { DataItem } from './types/index';构建相关配置
Vite配置
vite.config.js文件
- Vite构建能力由Rollup提供,因此大部分Rollup插件可以直接复用
const path = require('path');
const typescript = require('@rollup/plugin-typescript');
const { defineConfig } = require('vite');

const libName = 'LibName';
const bundlePrefix = 'index';

// 入口
const entry = path.resolve(__dirname, 'src/index.ts');

module.exports = defineConfig({
  plugins: [
    typescript({
      target: 'es5',
      include: ['src/**/*.ts'],
      esModuleInterop: true,
      module: 'esnext',
    }),
  ],
  build: {
    sourcemap: true,
    outDir: 'dist',
    minify: 'esbuild',
    lib: {
      entry,
      name: libName,
      formats: ['umd', 'cjs', 'es'],
      fileName: (format) => {
        if (format === 'umd') {
          return `${bundlePrefix}.min.js`;
        }
        return `${bundlePrefix}.${format}.js`;
      },
    },
    rollupOptions: {
      input: entry,
      output: {
        exports: 'auto',
      },
    },
  },
  server: {
    host: '0.0.0.0',
  },
});
const path = require('path');
const typescript = require('@rollup/plugin-typescript');
const { defineConfig } = require('vite');
const libName = 'LibName';
const bundlePrefix = 'index';
// 入口
const entry = path.resolve(__dirname, 'src/index.ts');
module.exports = defineConfig({
plugins: [
typescript({
target: 'es5',
include: ['src/**/*.ts'],
esModuleInterop: true,
module: 'esnext',
}),
],
build: {
sourcemap: true,
outDir: 'dist',
minify: 'esbuild',
lib: {
entry,
name: libName,
formats: ['umd', 'cjs', 'es'],
fileName: (format) => {
if (format === 'umd') {
return `${bundlePrefix}.min.js`;
}
return `${bundlePrefix}.${format}.js`;
},
},
rollupOptions: {
input: entry,
output: {
exports: 'auto',
},
},
},
server: {
host: '0.0.0.0',
},
});build下的配置释义
- outDir:构建输出目录
- lib
- entry:构建入口文件
src/index.ts - name:库的名称,挂载在
globalThis上的名称 - formats:产物包含的格式,这里指定了常见的4种
- fileName:针对不同格式,修改一下产物的名称
- entry:构建入口文件
完善pkg.json
package.json
{
  "main": "dist/index.cjs.js",
  "module": "dist/index.es.js",
  "types": "dist/index.d.ts",
  "scripts": {
    "build:dev": "vite build -w",
    "build": "rimraf dist && vite build",
  },
}
{
"main": "dist/index.cjs.js",
"module": "dist/index.es.js",
"types": "dist/index.d.ts",
"scripts": {
"build:dev": "vite build -w",
"build": "rimraf dist && vite build",
},
}- 添加构建相关指令
- 其中
build:dev主要用于开发调试,监听文件变更,有变更自动进行重新构建
- 其中
- 表明入口文件信息
main:设置cjs规范的文件module;设置ESM规范的文件
执行构建
npm run build:devnpm run build:dev产物说明
构建产物如下
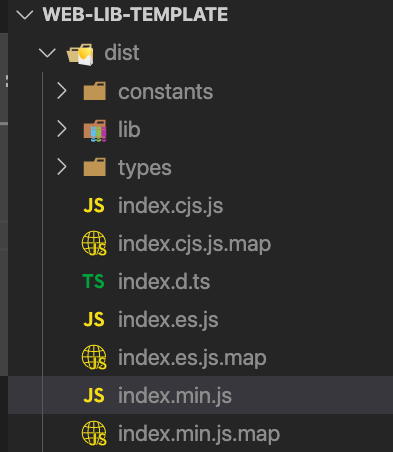
- *.cjs.js:构建工具引用
- *.es.js:支持ESM的构建工具使用
- index.min.js:CDN引入使用,其中UMD兼容AMD,commonJS,全局引用等等方式
注意事项
针对index.min.js(CDN引入使用)的一点说明
入口文件除类型导出外,如果只包含export default VarName1,那么globalThis.LibName就等于VarName1
export type { DataItem } from './types/index';
export default function Demo1() {}

// 编译后
(function(global, factory) {
  typeof exports === "object" && typeof module !== "undefined" ? module.exports = factory() : typeof define === "function" && define.amd ? define(factory) : (global = typeof globalThis !== "undefined" ? globalThis : global || self, global.LibName = factory());
})(this, function() {
  "use strict";
  function Demo1() {
  }
  return Demo1;
});
export type { DataItem } from './types/index';
export default function Demo1() {}
// 编译后
(function(global, factory) {
typeof exports === "object" && typeof module !== "undefined" ? module.exports = factory() : typeof define === "function" && define.amd ? define(factory) : (global = typeof globalThis !== "undefined" ? globalThis : global || self, global.LibName = factory());
})(this, function() {
"use strict";
function Demo1() {
}
return Demo1;
});如果包含其它导出export const vaeName2,那么globalThis.LibName就等于VarName1.default
export type { DataItem } from './types/index';
export default function Demo1() {}
export function Demo2() {}

// 编译后
(function(global, factory) {
  typeof exports === "object" && typeof module !== "undefined" ? factory(exports) : typeof define === "function" && define.amd ? define(["exports"], factory) : (global = typeof globalThis !== "undefined" ? globalThis : global || self, factory(global.LibName = {}));
})(this, function(exports2) {
  "use strict";
  function Demo1() {
  }
  function Demo2() {
  }
  exports2.Demo2 = Demo2;
  // 关键代码
  exports2["default"] = Demo1;
  Object.defineProperty(exports2, "__esModule", { value: true });
  exports2[Symbol.toStringTag] = "Module";
});
export type { DataItem } from './types/index';
export default function Demo1() {}
export function Demo2() {}
// 编译后
(function(global, factory) {
typeof exports === "object" && typeof module !== "undefined" ? factory(exports) : typeof define === "function" && define.amd ? define(["exports"], factory) : (global = typeof globalThis !== "undefined" ? globalThis : global || self, factory(global.LibName = {}));
})(this, function(exports2) {
"use strict";
function Demo1() {
}
function Demo2() {
}
exports2.Demo2 = Demo2;
// 关键代码
exports2["default"] = Demo1;
Object.defineProperty(exports2, "__esModule", { value: true });
exports2[Symbol.toStringTag] = "Module";
});如果的确需要有导出多个,那么建议
- 方式1:都是具名的导出
- 方式2:通过default导出一个对象,里面包含LibName
// 方式1
export function fun1(){}
export const var1 = 1
export class LibName{

}

// 方式2
class LibName{

}
export default {
  fun1(){},
  var1:1,
  libName
}
// 方式1
export function fun1(){}
export const var1 = 1
export class LibName{
}
// 方式2
class LibName{
}
export default {
fun1(){},
var1:1,
libName
}开发测试
PKG
在工程中执行如下指令,在全局创建一个软链接(执行一次即可)
npm linknpm link
在要测试的项目中引用
npm link pkgNamenpm link pkgName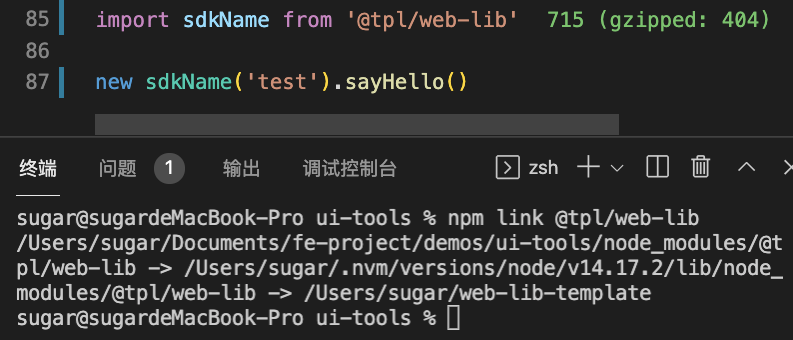
运行示例
CDN
本地在./dist目录下起一个Server服务,推荐使用http-server
# 安装http-server
npm i -g http-server
# 安装http-server
npm i -g http-server在 dist目录下执行http-server

测试页面中引入
<script src="http://127.0.0.1:8080/index.min.js"></script>
<script>
  new LibName('test').sayHello()
</script><script src="http://127.0.0.1:8080/index.min.js"></script>
<script>
new LibName('test').sayHello()
</script>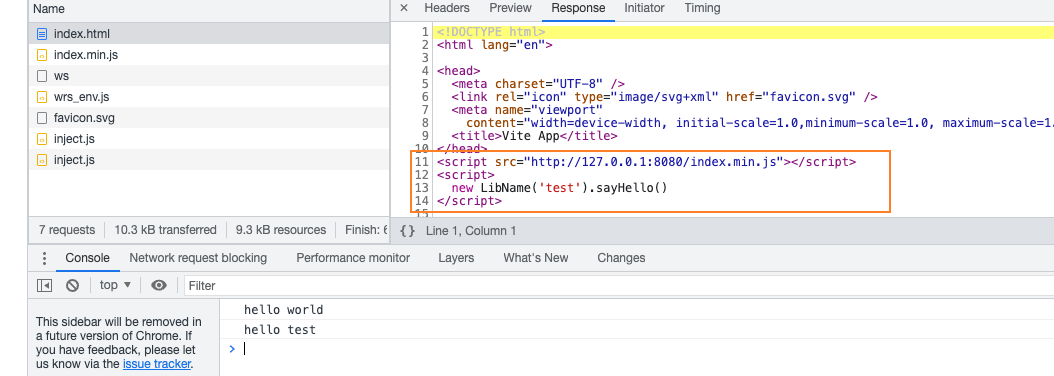
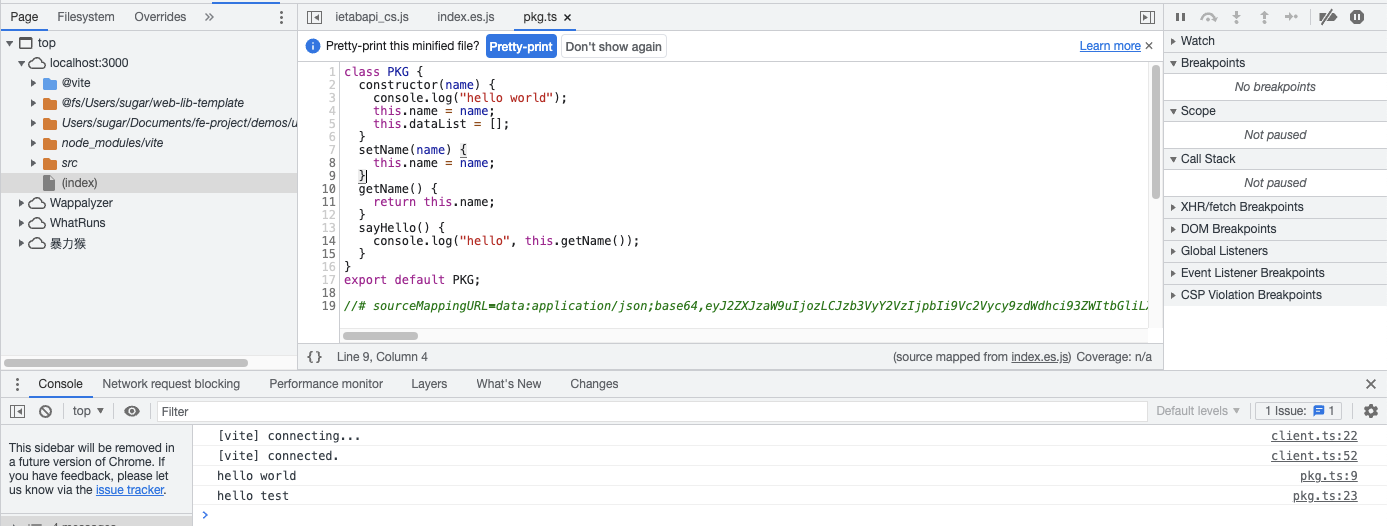
Vite
vite本身就是一个支持ESM的Server,在项目中测试使用完全没问题他
根目录创建一个index.html,在其中加入以下代码
<body>
    <script type="module">
        import PkG from './src/index.ts'
        new PkG().sayHello()
    </script>
</body><body>
<script type="module">
import PkG from './src/index.ts'
new PkG().sayHello()
</script>
</body>pkg.json中加入启动指令
{
  "scripts": {
    "serve": "vite",
  },
}
{
"scripts": {
"serve": "vite",
},
}启动
pnpm servepnpm serveCSS资源处理
css资源的处理方式有很多种,下面介绍几种常见的
测试样式
h1{
  font-size:48px;
  color:red;
}h1{
font-size:48px;
color:red;
}外部样式表
直接在入口文件src/index.ts中引入
import './styles/demo.css';import './styles/demo.css';build产物包含一个style.css文件,里面即为书写的样式
于是此种方式引入sdk的话,还需要额外引入一个css资源
style 标签
可以算作css in js的一种
先编写2个工具方法
- h:简化创建标签
- addStyleDom:向指定Dom下插入
style标签
/**
 * 创建HtmlElement
 * @param tag 标签名
 * @returns
 */
export function h(tag: string) {
  return document.createElement(tag)
}

/**
 * 通过style标签向目标DOM添加css样式
 * @param target 目标DOM
 * @param style 样式
 */
export function addStyleDom(target: HTMLElement, style: string) {
  const styleDom = h('style')
  styleDom.textContent = style
  target.append(styleDom)
}
/**
* 创建HtmlElement
* @param tag 标签名
* @returns
*/
export function h(tag: string) {
return document.createElement(tag)
}
/**
* 通过style标签向目标DOM添加css样式
* @param target 目标DOM
* @param style 样式
*/
export function addStyleDom(target: HTMLElement, style: string) {
const styleDom = h('style')
styleDom.textContent = style
target.append(styleDom)
}import style from './styles/demo.css';
import { addStyleDom } from './utils';
addStyleDom(document.documentElement, style);import style from './styles/demo.css';
import { addStyleDom } from './utils';
addStyleDom(document.documentElement, style);于是此种方式会将css内容写入到js代码中,在运行时自动通过style节点插入到文档节点中

scss/less支持
Vite内置对这两个预处理语言的支持,只需要安装相应的依赖就行
pnpm add -D less sasspnpm add -D less sass使用
import './styles/demo.scss';
import style from './styles/demo.less';
import './styles/demo.scss';
import style from './styles/demo.less';发布
要让别人使用,那就得将npm包发布上线
NPM
线上npm注册一个账号,调用npm login进行登录
npm loginnpm login发布前记得先build,然后commit暂存区的代码,清理工作区的变动
npm run buildnpm run build接着升级版本
npm version patchnpm version patch
发布
npm publishnpm publish
CDN资源
简单一点就使用UNPKG,可以读取发布到npm上的静态资源
为了速度更快的话可以将资源上传到大陆的OSS上,再通过CDN下发
<script src="https://unpkg.com/tpl-web-lib@0.0.1/dist/index.min.js"></script><script src="https://unpkg.com/tpl-web-lib@0.0.1/dist/index.min.js"></script>Demo
效果
会向你的页面中心位置添加一个tag

npm
# npm
npm i tpl-web-lib

# yarn
yarn add tpl-web-lib

# pnpm
pnpm add tpl-web-lib
# npm
npm i tpl-web-lib
# yarn
yarn add tpl-web-lib
# pnpm
pnpm add tpl-web-libimport libName from 'tpl-web-lib'
new libName()import libName from 'tpl-web-lib'
new libName()cdn
<script src="https://unpkg.com/tpl-web-lib@latest/dist/index.min.js"></script>
<script>
    new LibName()
</script><script src="https://unpkg.com/tpl-web-lib@latest/dist/index.min.js"></script>
<script>
new LibName()
</script>总结
文章比较详细的介绍了整个搭建过程,笔者水平有限,如有错误还请斧正
经过一些思考(文章篇幅与相关性),关于一些工程通用的能力,如eslint,api-extractor,prettier,jest,husky等等将会在后续文章中专门介绍